Shooting The Stars, Part 2: Techniques
By Ron Risman–
Let’s Get Ready to Shoot:
In Part 1 of this article, I gave you an understanding of where and when to capture the night sky. Now let’s discuss HOW to do it.
Since starlight is very dim, we need to set up our camera so that it can see in the dark. This is done by using a “fast” lens and through proper camera settings.
For best results, set your camera’s capture mode to RAW. This will give you the widest dynamic range and quality, and will allow you to bring out the most detail in post production. If you use JPEG, set your camera to RAW+JPEG and record both so that you’ll have a RAW file to work with should you eventually want to use advanced post-production techniques.
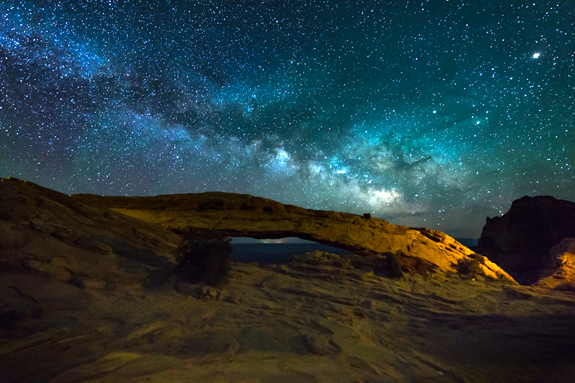
Mesa Arch and Mars. © Ron Risman
Large Aperture
A lens with a large maximum aperture helps to let as much light through as possible, and when shooting the night sky we want to set the aperture of the lens to its largest opening (if you’re using an F/2.8 lens, then set the aperture to F/2.8). With the aperture opened as wide as it can go we now need to adjust two settings on the camera: 1. The shutter duration which controls the exposure time, and 2. The ISO setting, which controls the sensitivity of the sensor to light.
Shutter Speed / Duration
Digital SLR cameras feature a mechanical shutter or “curtain” that opens and closes based on the speed you choose and ultimately determines how long the image sensor will be exposed to the light coming in through the lens.
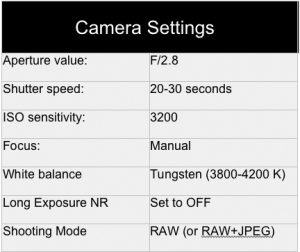 When shooting the night sky we’ll be using very slow shutter speeds, with durations between 20 and 30 seconds. Because the sensor will be exposed for a long duration, it is important to make sure that when framing the night sky you don’t have any bright lights around the area you’ll be shooting. Street lights, car headlights, and even a half moon are too bright for a slow exposure, and may ruin your attempt at capturing the night sky.
In dark sky locations, a 20-30 second shutter speed won’t let in enough light to capture the stars without help from the camera’s ISO setting. So, why not let in more light by keeping the shutter open longer? Well, because there is a trade off. Since the earth is constantly rotating, the stars in the sky are also constantly moving across our field of view. If we select an exposure value that’s too long, the stars will leave trails behind them. My primary goal for night photography is usually to have pinpoint-sharp stars but you can also get some striking images of star trails as I will describe in Part 3.
ISO Sensitivity
The higher you set the ISO value, the more light-sensitive the sensor becomes along with an increase in noise or “grain.” Despite some noise at higher ISO settings, today’s digital cameras are still quite amazing. In fact, some newer models set to ISO 3200 produce less noise than older cameras shooting at ISO 640. Not only have cameras become cleaner at higher ISO settings, software tools such as Adobe Lightroom allow you to clean up images even further.
Keep in mind that all cameras have a sweet spot, and just because the camera claims its ISO can reach 52,000 or 102,400 does not mean the image will look good at those settings. It’s best to test your camera to see what maximum ISO setting is acceptable to you. I do this by keeping the lens cap on and setting the camera to a 1-second exposure. Then I step through the different ISO settings, starting at around 1250 and ending at the maximum. Finally, I bring these test images into Lightroom and apply a small amount of noise reduction to each, looking for the highest ISO setting that shows minimal noise levels. That, then, becomes my ISO limit for that particular camera when shooting the night sky.
Long Exposure Noise Reduction
Hot pixels are caused by long exposure times and sensor heat build-up.
This feature can be found in your camera’s menu and when activated will help to greatly reduce hot pixels in your long exposures. Hot pixels are colored or white pixels that show up randomly on your image and are caused by the sensor heating up during long exposures. Warm weather during summer months also contributes to the problem.
While the feature works well I usually do not recommend using it unless you have a lot of free time. This is because it works by taking a second “black frame” exposure using the same exposure time as the previous image. If you waited 30 seconds for your night sky shot, the camera will then proceed to take another 30 second exposure while it captures a “dark” or black frame. So instead of waiting 30 seconds, you’re now waiting 60 seconds. Do this for each image and it starts to hinder your creativity and spontaneity when out shooting.
Hot pixels can be removed by using Dark Noise Subtraction techniques.
Long Exposure Noise Reduction works by comparing the noise in the dark frame to the noise in your previous image and removes hot pixels using a technique called Dark Frame Subtraction.
Some photographers will manually take a dark frame (with lens cap on) at the end of the night and will use that frame in Photoshop to do dark frame subtraction manually. The benefit of using this “manual” method is that you don’t have to double your exposure time for each image you take throughout the night. If you want more detailed information (along with tutorials) Google “Dark Frame Subtraction.”
Focus
When shooting the night sky, focusing becomes a challenge since your camera’s autofocus will have nothing to lock on to and will likely just keep searching for a focus point. Manual focus will solve this problem. If you haven’t used manual focus before, don’t worry– it’s as easy as turning on your camera’s Live View mode, and rotating the focus ring until the subject looks sharp on the LCD monitor.
A trick to focusing on the night sky is to aim the camera at whatever the brightest star is at that time (or a light on the distant horizon), use the Live View “magnify” button to make the bright star fill more of your screen, and then turn the focus ring until the star looks sharp (showing the smallest point of light). Now you can re-compose your shot, being careful not to touch the focus ring.
NOTE: You may also want to turn on your camera’s Exposure Simulation mode, which makes it easier to view low-light scenarios on the camera’s LCD display.
White Balance
When shooting in RAW mode, the white balance can actually be set later in Lightroom or Adobe Camera RAW, but for shooting purposes I like to be able to see what my images will look like when properly white balanced, so for the night sky I usually set the white balance manually to somewhere between 3800 and 4200 degrees Kelvin, depending on the amount of light pollution. I’ll make my final decisions about white balance during post-production.
Setting Up Your Shot
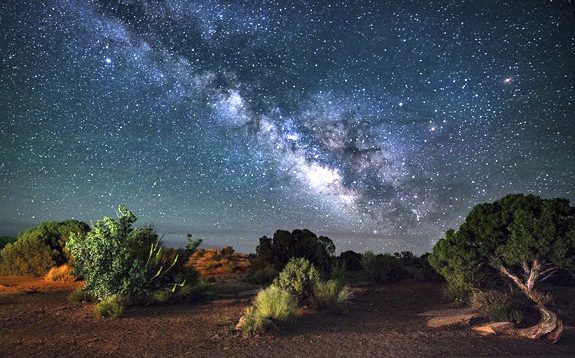
Shooting the sky without anything else in the frame tends to be boring so try to include something in the foreground. Photographs with layers (foreground, middle layer, and sky as your background layer) tend to be more interesting than an image without.
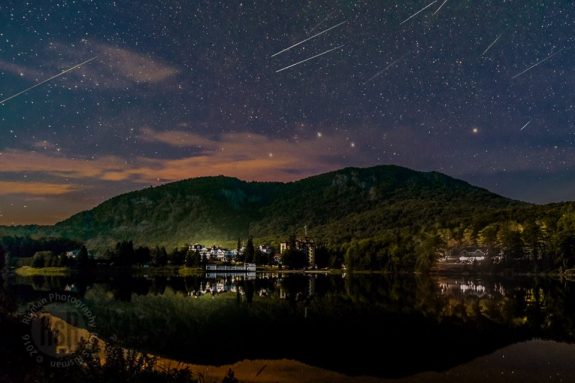
Good composition can make or break your shot. Composite image of meteor showers in the night sky at The Balsams Hotel in Dixville Notch, NH. © Ron Risman
If you arrive to an unfamiliar location and it’s already dark out, it will be difficult to see what your camera is seeing. This makes it tedious to compose your picture as you have to take a picture, wait 20-30 seconds, preview the image and then re-adjust over and over again until you get the scene looking the way you’d like it to. Here’s a trick I use that saves me a lot of time when composing my shot.
After I manually set focus on a bright star in the sky, I’ll adjust my ISO setting as high as it can go. This makes the sensor super light sensitive and allows me to use a much faster shutter speed of 1-2 seconds while I’m trying to compose my picture. Once I’m satisfied, I’ll lock my tripod head and am ready to go. Waiting a couple of seconds between pictures is much faster than waiting the full 20-30 seconds. NOTE: Remember to change back your shutter speed and ISO settings to where they originally were set.
Lighting Your Foreground
If you’re trying to incorporate foreground elements into your night sky photography you’ll find that the foreground gets pretty dark when shooting with no moonlight. To counter this I use very dim LED lights to throw a dim glow of light onto my foreground subject.
Lighting your foreground helps to balance your composition, shows the beauty of the location you’re shooting in and reduces noise levels by adding a small amount of light to the shadow areas of your image. © Ron Risman
When lighting your foreground you’re trying to match the luminance level of the stars, so you need very little light. While your eyes may barely see the light hitting your subject, your camera – thanks to its high sensitivity and settings – will bring out the brightness during the exposure.
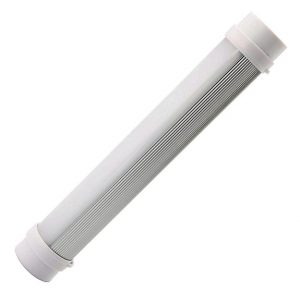
OxyLED rechargeable light
I keep a few OxyLED rechargeable lights ($15 at Amazon) in my camera bag. I can place them outside of the composition – on the ground, on rocks, hung from a tree branch or light stand, and I always use them on their dimmest setting.
I’ve also made a tungsten gel by purchasing a 48” Amber tube guard ($5 at Amazon) and then cutting it to fit the light. There’s enough length to make 4 light covers. The amber gel helps turn the LED light to a warmer color, which is perfect when capturing red rocks of the southwest. You can also purchase these tube guards in other colors such as green, red, and blue– fun for lighting the insides of cars, buses, trains, and more.
In Part 3, I’ll finish our series by explaining how to enhance your images in post-production and I’ll also tell you how to shoot exciting star trails. Don’t miss it.
About Ron Risman
Ron Risman is an award-winning cinematographer and founder of Timelapse Workshops. His client list includes Land Rover, Liberty Mutual, Restoration Hardware, itteQ! Japan, Scorpion Helmets, Revit! Sports International, Berklee College of Music, FOX CT News, and WFTV-9 Orlando. Ron’s work can also be seen in the Emmy award winning film “National Parks Symphony – The Mighty Five”, and in the HBO Documentary “The Crash Reel.”
Ron’s upcoming workshops include a 3-day advanced “night-sky” timelapse workshop in Moab, Utah from May 22-26, 2017 and a 4-day motion control timelapse workshop from May 26-31 2017. You can get more information about his workshops at: TimelapseWorkshops.com
Contact Ron at: Facebook: http://www.Facebook.com/risman
To see more of his work visit these sites: Instagram: http://www.instagram.com/timeographer
Vimeo: Vimeo.com/Risman
Portfolio Site: RonRisman.com
500px: https://500px.com/timeographer
Original Publication Date: March 01, 2017
Article Last updated: March 01, 2017
Comments are closed.


Categories
About Photographers
Announcements
Back to Basics
Books and Videos
Cards and Calendars
Commentary
Contests
Displaying Images
Editing for Print
Events
Favorite Photo Locations
Featured Software
Free Stuff
Handy Hardware
How-To-Do-It
Imaging
Inks and Papers
Marketing Images
Monitors
Odds and Ends
Photo Gear and Services
Photo History
Photography
Printer Reviews
Printing
Printing Project Ideas
Red River Paper
Red River Paper Pro
RRP Newsletters
RRP Products
Scanners and Scanning
Success on Paper
Techniques
Techniques
Tips and Tricks
Webinars
Words from the Web
Workshops and Exhibits
all
Archives
March, 2024
February, 2024
January, 2024
December, 2023
November, 2023
October, 2023
September, 2023
August, 2023
May, 2023
more archive dates
archive article list


