Get Maximum Shadow Detail in Your Prints
By Tim Grey–
In many cases a print will not reflect the full level of shadow detail as actually exists in the image file. Instead, that shadow gets “blocked up,” similar to the way shadow detail gets clipped in an exposure that is too dark. You can compensate for this issue by essentially brightening the value of black, causing all neighboring tonal values to be brightened up accordingly.
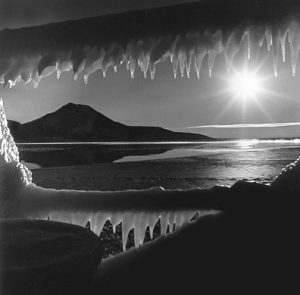
This image printed too dark, losing shadow detail that the photographer wanted retained. Image © Arthur H. Bleich
With the vast majority of printers I find that no compensation is needed for the white point. In other words, when producing a print with most printers using just about any paper, you are able to see a difference between pure white (no ink on the paper) and the next darker shade of white.
With dark shadow values, I find that many printers still have a difficult time producing distinct shades of black. In other words, the darkest black appears the same as one shade lighter, so you can’t actually see a difference between the two and shadow details get lost in a sea of black.
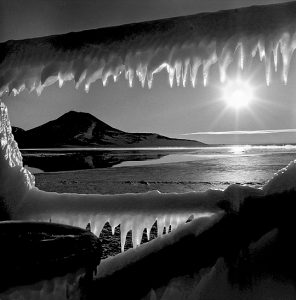
Using the results obtained from the Tonal Range Target, the Output Levels were adjusted from 0 to 15, improving the print considerably. Image © Arthur H. Bleich
In fact, I have often found that when photographers complain about a print that is too dark, what they’re really seeing is a print with a lack of shadow detail that appears too dark as a result. Opening up those shadow details can help tremendously.
The key is to determine the optimal adjustment to apply. This can be done using a print target image that contains a series of dark shades toward black (and a series of bright shades toward white). You can print the test image using your normal printing workflow, and then evaluate the results under a very bright light source.
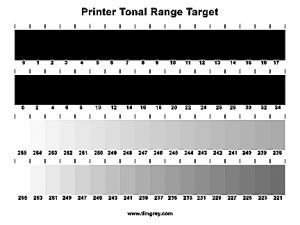
Download theTonal Range Target, and you’ll begin to bring out beautiful shadow detail in both color and B&W prints.
When you determine which tonal value is the first where you can see a visible difference between the two values, the darker of those two represents your target black point for the print. So in Photoshop you can apply a Levels adjustment just before printing, setting the Output Levels value for black to the value you determined from the test print.
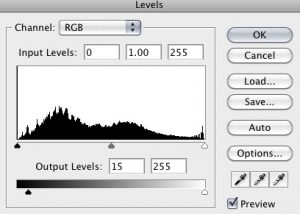
In Photoshop you will be adjusting the Output Levels at the bottom of the menu to achieve your results.
In Lightroom you could use the Tone Curve to apply the same basic adjustment. Be sure you are in the Point Curve mode for the Tone Curve adjustment, rather than the Parametric option. In other words, make sure you don’t see the sliders for Highlights, Lights, Darks, and Shadows below the curve; click the button at the bottom-right of the Tone Curve section if you need to switch modes.
Then drag the black end point of the curve (the bottom-left end of the diagonal line) upward. The adjustment value will be shown as a percentage in the top-left of the curve area while you are dragging, so you’ll need to convert the tonal level value to a percentage by dividing the value by 256 first.
http://www.timgrey.com/books/ccdownloads.htmIf you’d like to download a copy of the print target that I use for evaluating prints, you can get access by clicking on this link and I will also email you complete instructions for its use.
About The Author:
Tim Grey is a photographer who has written more than a dozen books for photographers, has published dozens of video training courses, and has had hundreds of articles published in magazines such as Digital Photo Pro and Outdoor Photographer, among others.
He also publishes the Ask Tim Grey eNewsletter, the monthly Pixology digital magazine, and a wide variety of video training courses through his GreyLearning website. Tim teaches through workshops, seminars, and appearances at major events around the world. Learn more at http://www.timgrey.com.
Original Publication Date: October 04, 2016
Article Last updated: October 04, 2016
Comments are closed.


Categories
About Photographers
Announcements
Back to Basics
Books and Videos
Cards and Calendars
Commentary
Contests
Displaying Images
Editing for Print
Events
Favorite Photo Locations
Featured Software
Free Stuff
Handy Hardware
How-To-Do-It
Imaging
Inks and Papers
Marketing Images
Monitors
Odds and Ends
Photo Gear and Services
Photo History
Photography
Printer Reviews
Printing
Printing Project Ideas
Red River Paper
Red River Paper Pro
RRP Newsletters
RRP Products
Scanners and Scanning
Success on Paper
Techniques
Techniques
Tips and Tricks
Webinars
Words from the Web
Workshops and Exhibits
all
Archives
March, 2024
February, 2024
January, 2024
December, 2023
November, 2023
October, 2023
September, 2023
August, 2023
May, 2023
more archive dates
archive article list


